Wee Cottage Lane Christmas

Wee Cottage Lane  Christmas
by Laura Pallatin of LaBelle Mariposa

Tuesday, December 13, 2016

Creating a Brand new Brand!

A collection of tiny homes on Wee Cottage Lane
In September I began dreaming about a special little tiny neighborhood with the perfect little homes and shops. I love creating dreamy environments where my imagination can go and play. I have been making ceramic art for a few years and bringing that work together with my love of tiny things, I envisioned my perfect little street, Wee Cottage Lane. I noodled, and rolled ideas around my imagination in order to come up with a name for my neighborhood that communicated the quaint cozy place I wanted to create. This began a project that would take over my imagination for the next few months. It started with an idea and has blossomed into a whole village!

I knew I wanted to make the houses of clay but also wanted to do something unique on the body of the houses. I really love adding fun unexpected details to each and every little building. So, for the door and roofs of each house, I use glaze to which gives each house and shop cohesion to one another. Also, almost every place in town has a golden door knob (even the outhouses!)

Here's what the sculpted houses with glazed doors and roof and golden door knobs: 

Wee Cottage and Gnome style home without paint

It is very important to me that my work has a very unique look to it. So far, I feel I was already off to a good start. I had used  Posca Paint pens and really like the way the finely ground pigments look and the fact that, once dry, they are permanent. So, I experimented with decorating each building with it's own look. I've added many different shops, homes, trees, and public buildings to the town. Each building is unique and, therefore, comes with it's own certificate of title! 

Wee Gnome Cottage and Certificates of Ownership

I also wanted my little houses and shops to have their own look in their on-line home so I purchased a bunch of different lights and tried different techniques to get the photography look I wanted. 


Mini Christmas scene

Coffee, Donut, and Tea Shops

Tiny Easter Egg Cottages

This has been a pretty involved process from the name, logo, fonts, house designs, painting, trees, etc... But, it has been so fun! 

I hope you enjoy the town and visit my little website to learn more about Wee Cottage Lane!

Saturday, January 30, 2016

Large, Splashy, Classy Ceramic Flowers

Flowers inspire me. Whether painting on canvas, walls, or my car, I love recreating what nature offers so freely enabling me to enjoy them when they are not in season. My creations don't fade or shatter, either. Therefore, it is natural that I would want to create flowers in ceramic as that is my material of choice most days recently. Making flowers the same size as their real counterparts has been fun. I've been making those for jewelry and display. Even making tiny versions is pretty cool and I enjoy wearing my tiny, nickel sized roses as pendants and earrings. But, I must admit, when it comes to art... I like making things BIG!! 

I just love exploding tiny things and exploring what all the parts are that make them so special. My recent flower experiments the orchid and pansy posted below are examples of this. 

In order to make these pieces, I prefer to have a real flower in my hands first. I do sacrifice one flower of each kind to take apart and look at all the components individually. I also photograph them so that I have a permanent record of the elements so I can refer back if I want to make more later. 

A large ceramic pansy with it's tiny counterpart in the upper left corner


My process for creating these big flowers is something that I noodled out with my imagination and I am not suggesting that it is "the" way to do it. A big part of the fun of creating for me is what I call the noodling process. It is when I have an idea of something I'd like to make and spend time imagining how I will execute my idea. Having the real flower to take apart is important for me because I make all of the parts of the flower, even the ones you can't see when it is finished. All of the petals are there, tucked under the petals that you can see. This is important for me. 

First things first, I needed to come up with a way for my flowers to be mounted do a wall, or have a flat spot so they can be displayed on a tabletop or in a book case. I chose to use a simple disk made out of clay with two holes punched into it for this purpose. I use a bit of tissue paper or cut up straw to hold the section by the holes open while the piece dries. I drew an arrow on this photo of a pansy so you can see where the spacer goes. I also use this base as a great place to add info like my signature and the year. You can also see from the back that all of the petals are there in their entirety as mentioned above. 


To make the actual flower, I start by identifying how many petals are in the flower, which ones are the same size and shape, and then how they overlap and go together to make the final flower. In the example of the pansy, there are five petals. the two on top are one shape, the two on the sides another, and finally the large petal at the bottom. I start with two balls of clay and make them about the same size. I tuck one under a damp cloth so it doesn't dry out while I sculpt the first petal and start pinching and pulling and squeezing the clay until I get the shape I want. As with all ceramics, I scrape grooves into my base and carefully attach the first petal being careful not to squash the spacer so that the piece can be hung when it is finished. Once I'm finished with the fist pair, I make two more balls of clay that are the same size and what I feel will work well for the second set of petals. Again, I tuck one ball under a damp cloth and sculpt the next two. Some pansies have the second set on top of the largest petal while other flowers have the larger bottom petal on top. Therefore, I vary the big ones to match the tiny inspirations flower. I use bits of tissue paper to separate the petals to make sure the finished piece is three dimensional.  

Work in progress of large ceramic pansy


I want to add that I really like to see the work of an artist in the finished piece. Therefore, I do not smooth out all of my finger marks on my flowers. Your work should reflect your aesthetic, so this is a place where you can decide what you want your finished work to look like. 

Each flower sits and dries for quite a while before it can go into the kiln for its first firing. In the Sacramento summers I can get stuff into my kiln within days. In the rainy summer months, the drying process can take weeks. Never put anything into a kiln that is not completely dry. If you are dying to see the results of firing, try leaving your piece in your kitchen oven overnight on the lowest setting. If you put your work in with even a little bit of moisture it will explode. I don't mean crack or even break, I mean explode. Any adjacent pieces will be broken, too and it can damage your kiln. 


Here are a couple of my flowers pictured together. I just love the orchid because they are so tiny and delicate that making a giant one was super fun! Also, you can see all the amazing details! 


I made the orchid using the same process as described above. The hardest part of the orchid was the center piece, but I've gotten that figured out now and am planning to make many more. There are so many amazing orchids available! One I'm attracted to is the monkey orchid. We'll see if that one shows up in the collection, too.


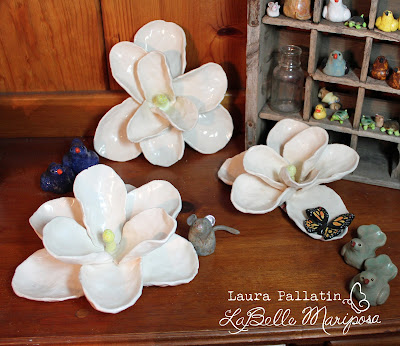
Magnolias were a natural addition to this line because they are already so large and splashy. These flowers are not actually a much larger versions of the original because my kiln is not that big and I don't know how an upsized magnolia would even support its own weight if hung on a wall. There are a variety of sizes and colors of Mangolias. Some smaller than the ones I've made and some even larger! They are all lovely, though and I'm smitten with their old Southern charm. 


A small collection of handmade ceramic magnolia blossom 

Handmade ceramic Magnolia Bloosom


Sunday, October 18, 2015

Getting ready for the Holidays on facebook... Artsy style

I've been noodling my holiday promotional images since Spring! Partly because I love styling my art, and partly because I think its important to have the holiday photography ready to go WAY before the holidays hit. I believe that, in this world of internet sharing, the photographs of our art as almost as important as the art itself. Almost no one who buys my art will see it in person before they bring it into their home. So, creating a brand, a "look" for my work is something that I spend a great deal of time on. I just finished a couple of images for my facebook banner and am just in love with them. They take a lot of work and I thought it might be helpful to someone else to share my process. This isn't the "right" way to do it, maybe. It is just what works for me. 

First, I collect things that I think would work for the look I'm going for. This time, I was collecting for Fall and Christmas. I especially like thrift stores for this because I buy more than I'll use and don't want to overspend. I audition many props before I come up with just what I think tells the story I want to tell. 

Here's the first image I shot for the fall facebook banner: 
raw photo before perfecting for my facebook page.


By looking at this picture, you can see the book I used to prop up the birds in the glass dish and a peak at the wall behind my drape. I like to take a group of photos, go to photoshop to see how it looks when cropped, and then go back and play with my items. Sometimes, I do this many, many times. I actually ended up climbing up on a chair and sitting on the back to get the shot I wanted. 

Here's a similar shot of the Christmas set up:
raw photo used for demonstration purposes only


You can see stuff I used to lift things up into the shot as well as a set-up that I ended up not loving. The roses are too bright and don't fit the look I was going for. I fetched another crochet shawl, changed out the nest on the cake, took LOTS of shots from different angles, and then... it all came together like magic!

Here are the final images:
LaBelle Mariposa 2015 Fall Facebook Banner


LaBelle Mariposa 2015 Christmas Facebook Banner

I cropped them wide because I plan to use them as banners on my facebook page. I find that leaving a blank spot on the bottom left works well for the way facebook lays things out. If you plan to promote your page, you'll want something that looks nice in that area, but that won't look silly if it's covered up because these images can be used for promotion. My log is in the upper right hand side because facebook doesn't put anything there. 

I use my best camera and set it to shoot without a flash. That's very important because a flash will blast out all of your hard work and make your image look depth-less. I welcome any questions in the comments section below. I hope you enjoy my photos and have fun making your own.!

Blessings,
Laura P.


Sunday, August 16, 2015

What is Reiki?

Chakra or Rainbow Pendant
What is Reiki?

Simply put, Reiki is a method of transmitting Healing Energy. Many cultures and religions practice some form of healing with energy. For instance, Christians practice “laying on of hands.” I believe we all carry the ability to transmit healing energy to one another. What many of us lack is a method. Reiki teaches us how to open ourselves to being healing conduits and offers an easy to follow format for achieving this.

My Reiki Master Teacher is Marion Hakata you can learn more about Marion here:  www.LivingRieki.com Marion has regularly scheduled classes in all levels of Reiki in the Sacramento, California area. To be a Reiki practitioner, you only need to have a one day “Reiki Level One” Class. However, there is much to learn in the alternative healing area and Marion’s classes do a very nice job of introducing many modalities throughout the program. Marion’s classes teach the method handed down to Marion through her Reiki Master Teachers which originated from Mikao Usui .


The pendant I’ve created is inspired by Reiki. The five loops remind us of the five principles:

1 - Just for today, I will not be angry.
2 - Just for today, I will not worry.
3 - Just for today, I will be grateful.
4 - Just for today, I will do my work honestly.
5- Just for today, I will be kind to every living thing.


The center of the pendant has a swirl representing the movement of energy. I filled the center of the swirl with gold to remind us that Reiki is a gift for ourselves and is most valuable when shared with others. 

If you would like to purchase a pendant here's a link: Reiki Art Pendant. 

Saturday, June 20, 2015

"Mended Hearts" an insight into my creative process

I've been asked about my creative process more than once. More specifically, how do I get new ideas. I think that a recent series I've been working on is a pretty good example of where my ideas start, how they evolve, and what can come of just one little thought. 

So, I was in the waiting room of the Kaiser Medical Center Cardiac Unit in Roseville, California waiting for my sweetie to meet with his Cardiologist. We got there plenty early because it's kind of a drive for us and we didn't want to take any chances on being late. We were there before the staff started seeing patients so the waiting room was full of patients and their companions. Arriving extra early gave me plenty of time to sit and do nothing. Nothing, that is except let my mind wander. I noticed that Kaiser had put a lot of money into art throughout their building. The Cardiac department, however, had taken it upon themselves to add heart bunting all around their reception desk. It feels like Valentine's Day all year long in the waiting room. All of their handmade signs are also heart shaped. 

The longer I sat, the more I started to notice that the people waiting for their appointments were a very varied group. Old, young, male, female... Large people and tiny people... Every nationality seemed to be represented. That made me think of all the different problems people have that bring them to a cardiology wing. That thought led me to thinking about broken hearts and how very painful that is... And mental illness can feel like heart trouble with panic attacks and crippling anxiety... 

That's when the paper hearts hanging all around came together with the pain of illness, heartache, and mental anguish. This thought carried me through to the process of getting well and, finally, overcoming all these challenges. Starting with pain, fear, anxiety, doing the sometimes difficult work of healing, and finally walking out of the other side somehow more whole than when the ordeal started... I started creating the "Mended Hearts" in my imagination before we were even called back to see the doctor. 

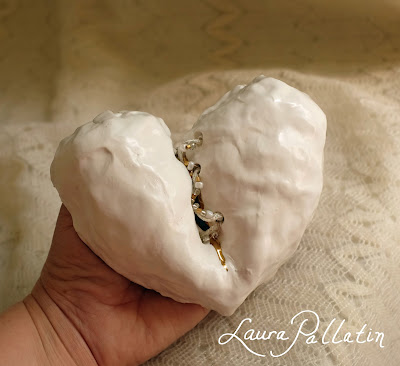
Each of the "Mended Hearts" explores pain, healing, and/or recovery. I'm pretty happy with this first 12 but I still have ideas for more rattling around in my head. As it happens, the next series is already starting to take form in my imagination and I will need to bringing that into the world pretty soon...

I've submitted three pieces to a juried show and should hear if they got in by the middle of July, 2015. I'll update the blog to let you know how that went. 

I hope you enjoy the series and would love to hear how they make you feel.

Blessings!
Laura P. 
No. 1 "So Much Pain"

No. 2 "My Blue Blue Heart"

No. 3 "Love Heals"

No. 4 "Healing Waters"

No. 5 "Pure of Heart"

No. 6 "Radiant Health"

No. 7 "Radiant Love"

No. 8 "Never Again"

No. 9 "Heart of Stone" 

No. 10 "Black and Blue" 

No. 11 "Fresh Start"

No. 12 "Black Heart" 

Thursday, June 4, 2015

Why I chose Etsy

Image result for etsy

I must confess... I resisted Etsy. I really wanted to do it on my own. I wanted to set up the look, style, feel, and environment in which I sold my art. So, I created my own website, stocked it with art and waited for the curious crowds to come knocking down my virtual door. Well, that didn't happen. So, I started looking at other options. At first, I thought I'd add just a few items to a site like Artfire because some of my cooler artsy fiends like and realized that it just didn't have the name recognition. I opened the account but didn't get much further than that. 

A turning point came for me hen I ordered a bag from a facebook friend, she requested I go through her Etsy site. She sells bags in her shop BrookVanGoryDesigns. She explained that Etsy helped her keep track of things and stay organized. This really hit home for me. I'm not that into organization. I'd much rather make art! 

When I seriously revisited Etsy, I found that they had lots of support and suggestions for people who genuinely want to make a go of it on their site. There is also a great deal of support from other artists. 

If you're doing research into what kind of success is possible on Etsy, check out this independent site that tracks Etsy sales: Craftcount. According to Alexa.com, Etsy is one of the top 1,000 websites in the world. Now, I understand not wanting to go with the crowd, and desiring to do things your own way. But, sometime we have to prioritize our time and choose what tasks are going to bring the greatest rewards.

What it comes down to is answering the question, "What is my goal?" Do you want to create a selling environment, or do you want to let someone else create the environment and you customize your own shop to sell your art?

I've had work on Etsy for a little over a month. I've had a couple of sales and I'm really happy with my shop. One thing I found very encouraging is other sellers who've included my products in Treasuries thereby exposing my work to a whole new audience. I'm following all the recommendations I've read on Etsy, Sharing my posting on social media like facebook and Pinterest, Blogging, adding a few items at a time, taking the very best photos I can... I'm giving this my best shot. You can follow along here to see how things go. I just wanted to take a minute to share my investigation and findings.

Blessings!

Wednesday, June 3, 2015

Functional Art is fun, too!

Caribbean beach house with a bird on it
I've been thinking about how I can translate my decorative ceramic art into functional pieces. While I absolutely enjoy art for art's sake, a friend recently asked me, "What would you use that for?" regarding my ceramic birdies. I thought that was interesting because no one every asked my what a painting was to be used for... But, it got me thinking. There are plenty of folks who will enjoy beautiful works of art (no matter how tiny) even more if they can "do" something with it. 

I've started this new direction with ornaments and ceiling fan pulls. Creating little houses has been on my mind for some time. I do so love miniatures. These are what I decided to start with. I'll continue to post the other ornaments and ceiling fan pulls as they come out of the kiln.

Little Ceramic Church with a mouse

Little thatch like houses with a bird

Cute little pastel cottage with a bird and yellow check ribbon

Tiny ceramic village on a hill

Wednesday, May 13, 2015

Ceramic Mice fresh from the kiln

Yesterday I said that I was excited about turtles coming out of the kiln. Well, they didn't turn out exactly as I'd hoped, so they are back in again today. These little mice, however, I think are adorable. So, ready to overload on cuteness? Here ya go!


The mama in the top picture has one more trip through the kiln because I think she'd be super cute with mother of pearl glaze on her nose and in her ears. 

Come back often to see what's out of the kiln!

Blessings!


Tuesday, May 12, 2015

Sharing love and art on Etsy!

A group of ceramic birds right out of the kiln
I've tried so many ways to promote and sell my art. I even have had an Etsy account before, but when I started to get serious about sharing my happy art with as many people as I could, Etsy was the main name that stood out to me. So, I'm really excited to be adding new items to my shop every day, and to be creating new and exiting items, too! 

Clay birdies drying and waiting for the kiln. 
I've also been down many roads when it comes to art. Painting on canvas, my art car, paper clay, quilts... as you can see... LOTS! While I enjoy using paper clay, I am so intrigued with the permanence of ceramic clay. For instance, some of the oldest records we have of civilizations is their pottery. I feel that I'm making cute little critters and things that will out last me by a long time. And, when anyone looks at and holds my little love offerings, they feel and enjoy the creative energy I put in each and every piece. Here's some pictures of art in progress: 


While I started with these darling little birdies, I've been having so much fun creating all sorts of critters. Right now, I have some mice in the kiln that I can't wait to see when I wake up tomorrow morning. For now, I'll share some of the little critters that I've already placed in the shop. Do check back soon for photos of those mice. I hope they are as cute in real life as they are in my imagination!
mini critters made by Laura Pallatin of LaBelle Mariposa

Teeny tiny turtles by Laura Pallatin of LaBelle Mariposa